

Welcome!
Each Wednesday check this blog for a strategy, process, or reflection for illustration with the iPad app ProCreate. This Wednesday Wrap Up shares another way to make patterns, thanks to Lisa Bardot.
Inspiration
In my CLmooc FB group, we share many different art prompts found on the Internet and Instagram. Here’s a few:
Now my inspiration lately derives from two places:
- The DS106 Daily Create [About] [My Previous Posts]
- Lisa Bardot’s Making Art Every Day [My Previous Posts]
Last week’s Making Art Every Day focuses on things in the kitchen, in particular for this prompt: tiles. And that’s the inspiration for today’s Wrap Up– getting texture and the tile lines into the pattern.
The Work
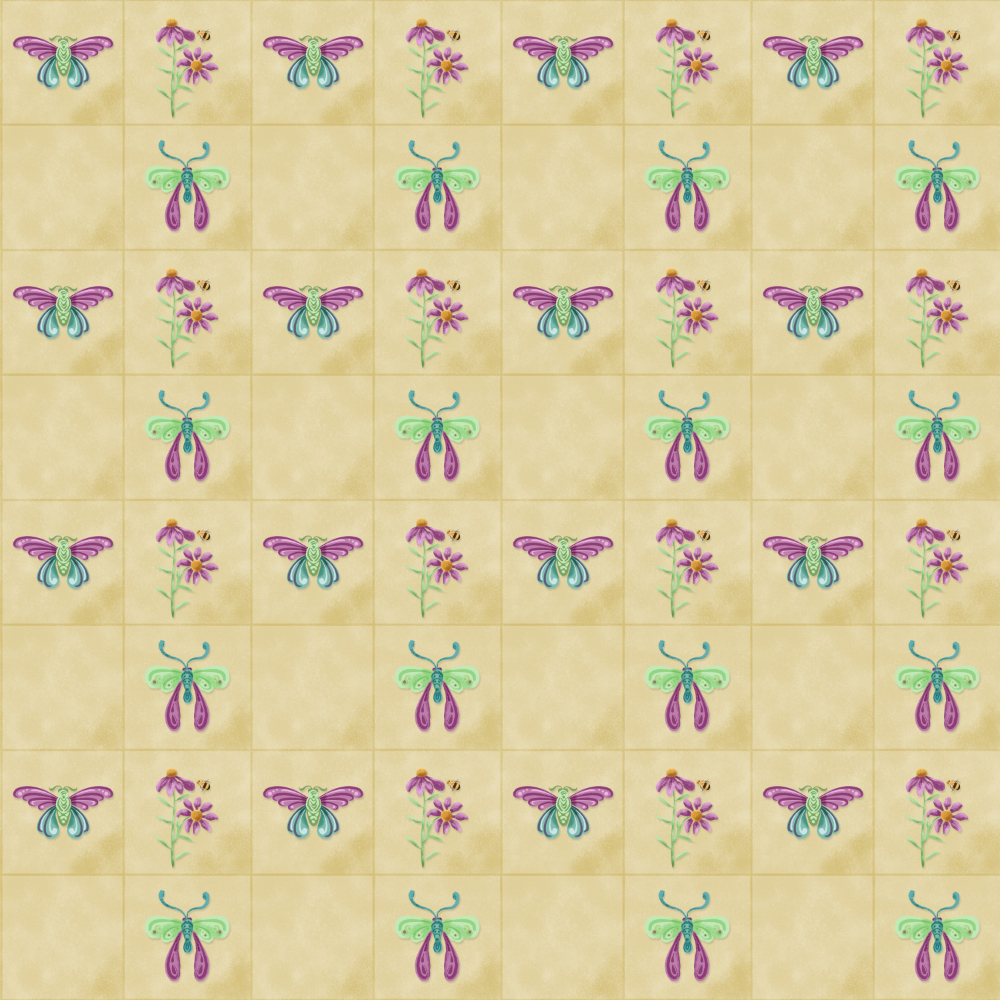
As you see in the image, I’ve created a tile pattern with moth, coneflower, and bee as elements. Using a quadrant of four tiles, I created 2 moths and a coneflower with a bee. I left one quadrant blank so the pattern wouldn’t be cluttered. I used Lisa Bardot’s “Basic Toolkit” brush set, which comes with step-by-step directions for creating moths using the brush set so you can learn to use the brushes.
As I looked at the finished quadrants, I realized that it did not look like tiles — I needed the “grid” between them– the edges of the tile, plus a bit of texture and shading. See these in the image above?
I knew I would create the pattern following the repeat pattern process in Lisa’s Repeat Pattern tutorial. It’s a new process which also does not require the starting image to be square. Whoa! That’s cool! Take a look at the tutorial to see her process. As you work, you can grab the layer with your pattern on your ipad, and pull it over to your split screen with Safari at the website of her Pattern Tester. That really helps you find early errors.
Back to my problem– the grid and the texture. This adds to the time and process to make a pattern, but it works: I drew on one layer the grid lines and their shadow to the horizontal and vertical center, almost to the edge, and then followed the repeat pattern process she shares to get a repeating pattern for the tile’s edges, the grid lines.
With the texture, I added in the texture on another layer– but not touching the edges. Then I followed the process in Lisa’s repeating pattern tutorial to create the repeating pattern of texture and shadow.
I found that I did need to repeat the horizontal and vertical movements, twice for each of these patterns in order to get the patterns complete.
The texture layer in the moth tile pattern is set to color burn over a filled yellow layer.
I am loving the brushes and the pattern process. Remember: keep snapping and magnetics on when moving the pattern into place.
Try It!
It never hurts to get a new strategy and this pattern process is one I’ll add to my repertoire. Thanks to Lisa Bardot for her teaching and also her new communty: Artmakers Club, where artists gather and learn together, with Lisa’s classes available for learning.
Lisa Bardot Artmakers Club
I must thank all the artist teachers who inspire me — Lisa Bardot being just one important part of a novice or experienced artist’s journey. See links to Lisa’s sites and my other inspirational mentors here: Artist Resources.
Thanks to all the artist teachers who have inspired me to just give it a try– and I hope you join in.
I look forward to your sharing, and please continue to be a part of the #warmup4art series to learn and enjoy our work together! See my sharing at IG @42Sheri and Twitter @42Sheri.