

Welcome!
For the past few weeks, this blog has hosted “Wednesday Warm Up,”— a day of usually quick drawing, inking, brushing as warm up to our serious art. I share a strategy to try each Wednesday using the iPad app ProCreate. I only use the brushes in the app— there are so many I haven’t tried that warming up with a new brush will be an added bonus and challenge.
This Week
This warm up is about learning to ink and watercolor from your own photos. I’ve been inspired over the past year by several Skillshare teachers and have been practicing and apply the skills in daily doodles and art projects. I highly recommend Skillshare as a learning platform. Artists learn from others by practicing and trying new things. These difficult times of staying home offer an opportunity of time to learn from many teachers and share the learning as the processes become one’s own.
Today, I decided to share how I snap my own photographs to create my ink outlines and shading and apply water color. It’s something I’ve loved doing, and you can too.
These teachers were inspirational:
Jennifer Nichols: Texture Brushes and Overlays — today I experimented with the Noise brush, a useful brush for shading illustrations, and here to create the textured overlay.
Brenda Bakker: Tap and Dab from Sketchy Doodles — no matter how hard I try to “watercolor,” I seem to gravitate to the quick tab and daub strategy that Brenda shares in many of her classes. Here I applied this to the water blending and glazing especially.
Liz Kohler Brown: Ink Illustration — one of my favorite classes and strategies is to use stipple and lines to create the illusion of depth and curves. In this warmup, we outline and then add lines and dots to create the curves and shading of the floral and leaves from our own photos.
Lettie Blue Inking Watercolor — Lettie teaches how to create your own brushes from inking, which is something to think about. Here, I simply use the illustrations to arrange a design.
The Goal
The goal is to share how I’ve adapted the strategies from many teachers and show how a style can develop from practice, even if that “practice” is tracing. Today we “trace” outlines and shadows of our own photos.
Lest you think we should not trace or imitate, that is how we learn. Think of a child learning talk or walk. Think of the old time schools of art where apprentices copied the masters. And here’s a Twitter thread of our need to be visual learners through what we see:
The Process
For you, I’ve created a video and slides/pdf of my process. The slides and pdf include more about the Procreate water brushes, saving your brush sets, creating a palette from your photo, and my process for inking and watercolor.
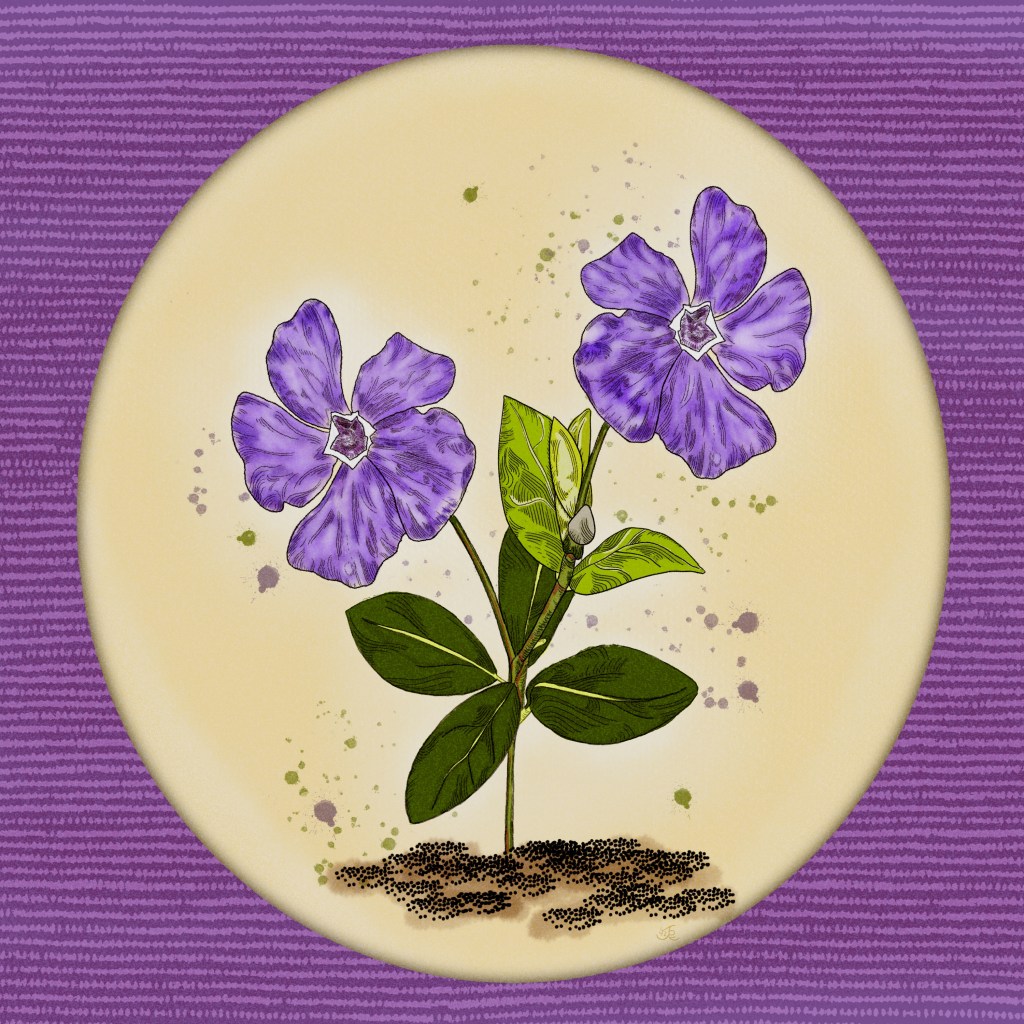
The video below explains the process through a few slides and replays of one of my recent projects– the Periwinkle, a lovely evergreen plant in my yard that blooms in white and purple blossoms each spring.

From this image, I created the inked outline for the flower, the older leaves, the newer leaves, and the bud, each a separate outline. I can duplicate this file to rearrange as needed– or, as Lettie will show you in her class– make them into brushes to stamp when needed.
Video: Ink and Watercolor
Slides: Includes SetUp, Brush Categories, Palettes, Inking, Watercolor
Link to Slides
WarmUp4Art: Ink and Watercolor
Try it!
Go ahead –try it. Think of all the “at the ready” florals you could create! For another idea, see the WarmUp, Symmetrical Floral Outlines.
Enjoy the process of inking and watercolor. Be sure to check out Skillshare and the many teachers if you’re really wanting to up your art game. And, please remember to add any suggestions or ask questions here if it’s not clear, Let’s share #warmup4art .

1 thought on “Wednesday WarmUp Learn Inking with Own Photos”